Home
>
Blog
>
Inspiration & Ideas

Easy holiday DIY crafts

Woman sitting at a table surrounded by holiday crafting materials.

Is there any season better for DIY crafting than the holiday season? Whether you’re fashioning cozy decor for your home, creating thoughtful gifts for others or making memories with your family, there’s no shortage of excuses to break out a glue gun and get crafty.


Pinterest and TikTok are full of holiday craft ideas, but hey, you’re probably busy enough planning other holiday magic to spend more time scrolling. We’ve compiled a list of our favorite easy holiday crafts for kids AND holiday crafts for adults to make your season extra merry and bright.

Handmade ornaments

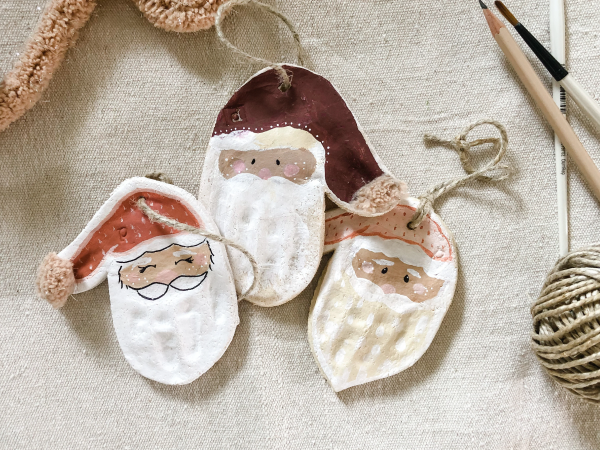
There’s a reason this is first on the list—there’s something about a handmade ornament that never fails to add charm to a tree year after year. There are also many ways to create a cute ornament from the heart! One that we’ve seen all over TikTok and Pinterest is this keepsake handprint Santa ornament. We love it because it’s easy to make, personal (how sweet would it be to send out new ones to family and close friends every year?) and it looks adorable. Many people make theirs from homemade salt dough, but we also like air-dry clay because it can last longer and doesn’t require baking!

Handprint Santa ornaments.
Image: www.coleykuyperart.com

Supplies:

Air-Dry Clay

Acrylic paint

Paint brushes

Fine tip permanent marker

Twine string

Pom poms

Hot glue gun or Tacky Glue

Small rolling pin

Pencil (to sketch out Santa’s face)

Knife (to cut out the shape)

Straw or toothpick (to add a hole for the ribbon to pass through)


Directions:

  1. Roll out your clay to a thickness of 0.25–0.5 inches.
  2. Place your child’s hand on top of the rolled-out clay and press down. They should keep their thumb sticking out and 4 fingers close together (the thumbprint will form the hat, and the fingers will form the beard).
  3. Cut around the hand print, leaving approximately 0.5" around it. Create a hole at the top of the “hat” for the twine to pass through later.
  4. Allow the clay to dry according to the manufacturer’s instructions.
  5. Once the clay is dry, sketch out Santa’s features (optional) and then paint his hat and face using acrylic paint.
  6. Once the paint is dry, add details like eyes using a black permanent marker, and glue a pom pom at the end of Santa's hat.
  7. Thread your twine through the hole at the top of the hat and tie. Write the year and your child's name and age on the back.


Dried orange garland

While no longer as ubiquitous during the holidays as candy canes or gingerbread houses, oranges have been part of the Christmas tradition since the 19th century in the United States. Oh, and also thanks to St. Nicholas (yes, THE St. Nicholas) way back in the early AD days. Instead of leaving them in stockings to be enjoyed on Christmas Day, why not use some to decorate your home in the form of a dried orange garland? It’s environmentally friendly, easy and fun to make, and it looks gorgeous!
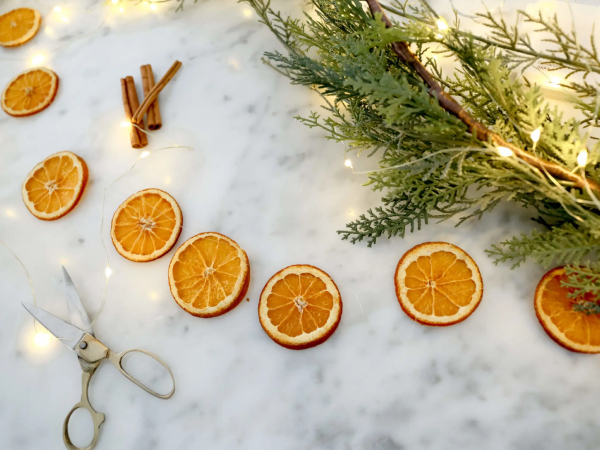
Dried oranges and greenery on a table.
Image: thegingerhome.com


Supplies:

4–5 oranges

A sharp knife

Cutting board

Parchment paper

Baking sheets

Paper towels

Clear fishing line 

Cooling racks (optional)

Cedar, fir or faux greenery garland 

White fairy lights (optional but very fun)


Directions:

  1. Preheat your oven to approx. 225º F (you can even go lower than this if you're concerned about burning).
  2. Line your baking sheets with parchment paper.
  3. Slice your oranges (approx. 1/8–1/4" thickness) and place them in a single layer on the sheets. Blot with a paper towel.
  4. Place your tray(s) in the oven and bake for approx. 3 hours. You'll want your orange slices to turn slightly brown and dry (consider flipping them halfway through to ensure an even bake).
  5. Let your orange slices cool (if you have cooling racks, this speeds up the process) for a few hours.
  6. Use your clear fishing line to poke holes through the flesh of your dried oranges and attach them to your garland. We recommend spacing them out a few inches, but it's completely up to you! If you want to add a little more pizzazz, string white fairy lights around your garland before attaching your orange slices.
  7. Hang your beautiful dried orange garland up over a window or mantle and enjoy!


Scenic wreath

Is anyone else humming "(There's No Place Like) Home for the Holidays" right now? There's something about a vintage car, laden with shiny pressies, driving down a pine-lined road that brings out the nostalgia in all of us. Even if we haven't personally ever seen this IRL. A wreath is a must during the holidays, and we love how charming this idea is (just think how much fun you'll all have picking out the perfect car for it)!
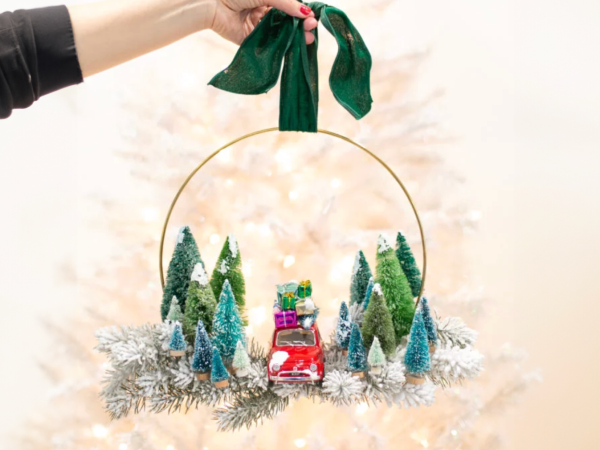
Hoop wreath with bottle brush trees and a toy car.
Image: lovelyindeed.com


Supplies:

Brass hoop

Sisal bottle brush trees of all sizes and colors

Toy car

Snowy faux tree branch

Mini gifts

Faux snow

Hot glue gun

Tacky Glue

Floral wire

Ribbon

Scissors


Directions:

  1. Cut your snowy faux tree branches as needed and attach them to your brass hoop using floral wire. These will form the base that everything will rest upon, so make sure it's robust and secure (don't skimp on the branches!).
  2. Glue some mini gifts onto the top of your car using your hot glue gun. We recommend gluing the gifts together first, and then gluing the attached pile to the car afterward.
  3. Use floral wire to attach the car onto the wreath with the front facing forward. Wrap the wire(s) around the wheels of the car, and then weave the ends through the snowy faux tree branches and twist shut to secure.
  4. Add your brush bottle trees! Place the larger ones toward the back and attach using floral wire to the snowy faux tree branches, then place the medium and small trees in front and either wire or hot glue those in place.
  5. Add a little faux snow to the car and treetops for a wintry scene. Apply some Tacky Glue wherever you want a little extra snowy magic, and then sprinkle the faux snow there and let it dry.
  6. Once everything is dry, tie a ribbon to the top of your wreath and hang it up with pride!


Ornament tree wall decor

This very merry holiday craft is great for 1. People whose Christmas ornament collection has outgrown their tree size (relatable), 2. People with cherished vintage glass ornaments and curious children and/or pets (not the best combo), or 3. People who love the idea of a Christmas tree on their wall. You can use your own ornaments (a mish-mosh of vintage baubles looks especially cheerful) or scour your local thrift shops or Etsy for some one-of-a-kind festive finds. 

Ornament tree wall decor.
Image: inspiredbycharm.com


Supplies:

Vintage ornaments (your own or from Etsy)

A linen-covered bulletin board

White pearl straight pins


Directions:

  1. The goal is to create a shape out of the ornaments that resembles a classic Christmas tree. So start by creating the base of your "tree" by pinning an assortment of ornaments in place. Angle your pins upwards a bit to keep the ornaments from falling once your board is upright. They should all line up at the bottom in a straight line, but mix and match shapes above (balls, bells, finials, etc.) to avoid even rows. Leave space at the bottom for your "trunk."
  2. Continue filling in the rest of your "tree" by narrowing the shape as you go up. Anticipate shifting ornaments around as your masterpiece unfolds.
  3. Before you reach the top, add a star- or angel-shaped ornament at the very top. Then, fill the space between that and the "tree" with ornaments.
  4. Add a suitable ornament to the base of your "tree" for the trunk. We recommend opting for a more "rectangular" ornament to go here, but you can get creative.
  5. Carefully hang up your ornament wall decor and admire it all season long (just keep it out of reach from little hands and/or paws)!


Snowy candle holders

Fun backstory: The author of the very blog you're reading right now made these years ago and still loves bringing them out every winter! These tealight/votive holders look like glowing snowballs, and you can easily make them using only four items. Or jazz them up with some extras!
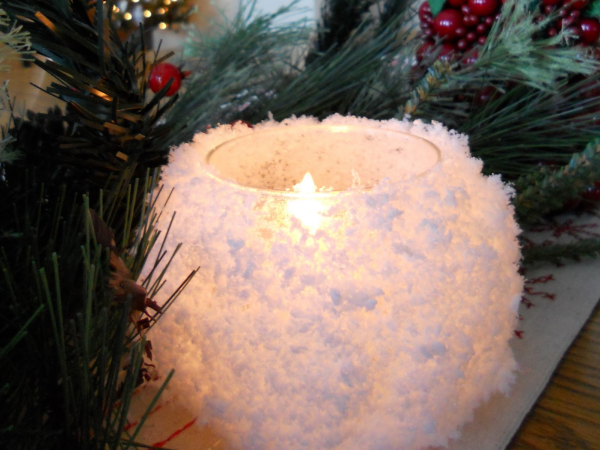
Votive holder covered in faux snow.
Image: justanotherhangup.blogspot.com


Supplies:

Clear glass votive holders

Faux snow

Spray adhesive or Mod Podge

Battery-operated candles

Mini wreath candle ring (optional)


Directions:

  1. Pour your faux snow into a box or container big enough to dip your glass votive holders into comfortably.
  2. If using the spray adhesive, go outside and spray the exterior of a votive holder with the glue. If you're using Mod Podge, "paint" your Mod Podge all over the outside of a votive holder (you can do this inside or outside your home). Do each votive holder one at a time since the glue will dry quickly.
  3. Dip and roll your votive holder into the container of faux snow to coat the exterior entirely. Lightly pat it down to ensure the faux snow adheres to the surface well.
  4. Repeat for the other votive holders.
  5. Let your votive holders dry. If you want to make them even snowier, apply another coat of spray glue (we don't recommend using Mod Podge if you do a double faux snow layer) and roll your votive in the faux snow again. Let them dry.
  6. That's it! Just place your battery-operated, flameless candles inside and turn them on. If you want to make them even more festive, place your snowball votive holders over mini wreaths (the shadows and silhouettes they create look lovely when the lights are turned on).


Handprint menorah

Simple and sentimental, this Hanukkah craft allows kids to get (a little) messy while creating a keepsake their parents can hold onto and get misty-eyed over as their kids grow up. If your kids are a bit older, you can also use this craft to explain more about the history and traditions of Hanukkah!
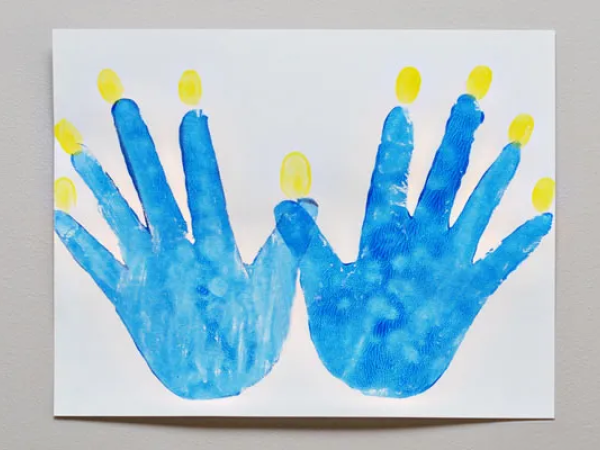
Child's handprints in blue and yellow forming a menorah.
Image: sheknows.com


Supplies:

Cardstock paper

Blue paint

Yellow paint


Directions:

  1. Lay a sheet of cardstock paper on a flat surface so it's horizontal.
  2. Pour blue paint onto a plate, and carefully dip your child's palms/fingers into it.
  3. Help your child press their hands down onto the cardstock paper. You'll want to have their fingers spread out and their thumbs overlapping to form the shape of the menorah.
  4. Wash their hands thoroughly.
  5. Help your child dip their thumb into the yellow paint, and then have them put a yellow thumbprint over each blue finger/candle on the cardstock to create the "flames." They can do them all at once or do one for each night of Hanukkah!


Bottle brush tree drink stirrers

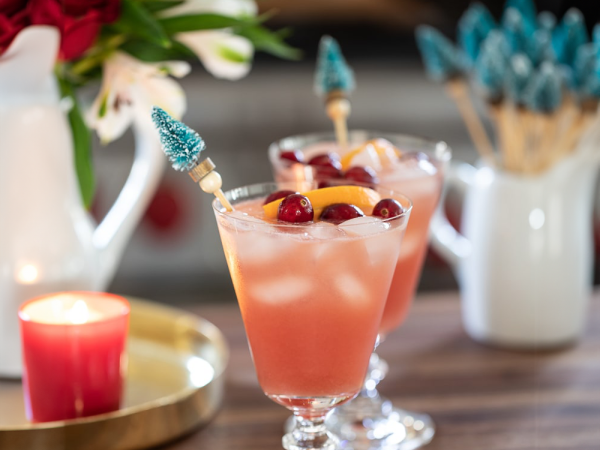
Festive AND functional? Oh ho-ho-how much we love that combo! Drink stirrers are typically associated with the more adult drinks out there, but you can bet the kids will love using these to stir their hot cocoa concoctions. (FYI, they made great host gifts, too.)

Drinks with bottle brush stirrers in them.
Image: inspiredbycharm.com


Supplies:

Tiny sisal bottle brushes 

Wooden lollipop sticks

Sandpaper

Hot glue gun or super glue


Directions:

  1. Sand the tops of your wooden lollipop sticks to create a flat surface. You'll glue your sisal trees here, so the flatter, the better!
  2. Brush off any sawdust from your stick, then apply a small drop of glue to the top of it. Add a sisal tree to this and hold it firmly upright in place for 20–30 seconds, depending on the glue you use.
  3. Repeat until all of your fancy and fun drink stirrers are made, and then grab a mug of your favorite winter drink and enjoy!


Gift throw pillows

Too many throw pillows simply isn't a thing, especially during cozy season. There are always tons of pre-made seasonal pillows out there, but given how quick and easy it is to create one that's absolutely perfect for your home, why not go the semi-DIY route? Trust us—it'll look even better than the store-bought ones (and cost way less).

Red pillow with white bow on it and a sprig of greenery.
Image: goodhousekeeping.com


Supplies:

Throw pillow covers (can do a solid color or a classic tartan print)

Pillow inserts

Ribbon

Hot glue gun

Extra decorative items like:

Directions:

  1. Tie or glue your ribbon onto your pillow cover into the classic crossover shape of a gift box and tie a bow. If you're tying it on (recommended if you want to repurpose the pillow covers for something else later), tie the ribbon on after you've filled them with a pillow insert. If you're gluing everything in place, you can also opt to add the bow as a separate piece if you prefer.
  2. Get creative! Here's where you can really personalize your pillows. If you have curious pets or small children, consider tying a felt ornament below the bow to look like a gift tag. If your fellow home dwellers are less likely to eat or want to tug at the decor, add a faux sprig of holiday greenery, some woolen acorns or a metal wire tag below the bow. We love the last option because you can create a personalized pillow for each person, or add a simple "Merry" or "Joy" greeting. It's really up to you and what works best with your decor and lifestyle!


If there’s one thing that makes holiday DIY crafting even more fun, it’s doing it with others! Host a cozy crafting party using one of Evite’s holiday invitations or design-your-own invitations (talk about really setting the DIY vibe!) to easily bring everyone together for a day of creative fun. Of course, the holidays aren’t the only time you can get crafty—check out more DIY crafts to do with your kids and besties all year round!

No items found.

No items found.

No items found.

No items found.

No items found.

No items found.

No items found.

All of the products we feature are hand-selected by our editors! You see only what we love and what we think you'll love too. If you buy something through links on our site, Evite may earn a commission. Prices are subject to change.

No items found.

No items found.

What makes Evite SignUp Sheets different from SignUpGenius?

Developed hand-in-hand with community organizers, PTA presidents, parents and teachers, Evite's signup sheets are designed to make organizing volunteers a breeze. Here are a few ways SignUp Sheets are different than SignUpGenius:

  • 100% free: SignUp Sheets are free to use.
  • Ad-free: No popup ads ever! Our signup sheets remain clutter-free, keeping your volunteers focused on signing up.
  • No extra login required: Seamlessly use your Evite account to create and manage your signup sheets, keeping all your events in one convenient location.
  • Automatic reminders and notifications: Stay on top of your event with automated reminders and notifications for you and your participants. Perfect for busy parents, teachers and anyone juggling multiple commitments.
  • Customization options: Tailor your signup sheets to your specific event, whether it's a school fundraiser, potluck, volunteer opportunity or team activity. Add custom tasks, time slots and requirements for smooth coordination.
  • User-friendly experience: Our intuitive interface makes creating and sharing signup sheets simple for everyone, regardless of tech experience.
  • Real-time updates: Get instant notifications whenever someone signs up or makes a change, so you always know where things stand.

Choose Evite SignUp Sheets for the easiest, most streamlined way to get volunteers and signups for your next event!

What is a signup sheet?

Signup sheets are the perfect way to streamline scheduling, volunteer recruitment, class parties, snack duty, potluck organization, parent-teacher conferences and more! You can think of them as your digital assistant for coordinating events and tasks and ensuring that your event is a success.

Evite SignUp Sheets offers parents, teachers and event planners customizable online forms that organizers and volunteers can access and update effortlessly. Volunteers can choose their preferred time slots, sign up for tasks or indicate what they'll bring to the event. It only takes organizers a few minutes to create a signup sheet and send it out with a shareable link, so they can get the word out via text, email or social media—whichever way they prefer! 

Long story short, signup sheets save everyone involved tons of time, avoid scheduling headaches and ensure everything runs smoothly before and during the event.

How do I create a signup sheet?

Creating a signup sheet has never been easier than with Evite! Here’s how to create a sheet that’s sure to make your event an absolute success:

  1. Go to Evite SignUp Sheets and choose the template that best fits your needs. Evite offers multiple signup sheet templates perfect for every occasion, including:
    • Signup sheets for one day events (without different time slots), perfect for when you’re organizing a class party, potluck or end-of-season party.
    • Signup sheets for single or multiple day events (with time slots), perfect for when you’re organizing concession stand volunteers, fundraisers, parent-teacher conferences, meal train, post-game snack duty or during appreciation week.
  1. After selecting your sheet template, create a title for your signup sheet and add the date, the location, the time (if applicable), who the organizer is, the organizer’s phone number or email and an optional note describing the event to your volunteers. You can also change your signup sheet background and title image if you wish!
  1. Next, create slots for your signup sheet. If you aren’t logged into your account, you will need to do so at this point, but luckily, you can use your existing Evite account (no need to create yet another login!). What you’ll include here will depend on what your event needs, but you can include a list of what’s needed (along with optional descriptions), how many volunteers are needed, and dates and times.
  1. After creating your slots, you can then add a wish list from any retailer or include supply suggestions from Evite’s retailer partners. These are to help your volunteers find and purchase supplies quickly and easily.
  1. Finally, review your sheet, copy your shareable link and send it out to everyone on your list! Every time a volunteer signs up for a slot on your signup sheet, Evite will email you. We will also send reminders to you and your volunteers before your event so no one will forget about it, and we’ll even let volunteers know if you remove their slot or cancel your event sheet so you don’t have to!

What information should be included on a signup sheet?

When it comes to signup sheet information, there are some essentials to include regardless of what you’re organizing:

  1. A title for your signup sheet. Tip: Aim to keep your signup sheet title concise but clear. You want volunteers to read it and have a general understanding of what your event is about, and also make it easy for them to look for later if they need to reference your sheet again. You have the option to include a more descriptive note in a different field about your event, so save the more in-depth details for that!
  1. When and where the event is taking place. 
  1. The organizer’s name and phone number.
  1. Slots for volunteers to choose from. Once you choose the SignUp Sheets template that fits the occasion, the slots you’ll need for your sheet will be right there and ready for you to add the relevant info, such as dates, times, items to bring and tasks to complete. 

When adding your slot information, clearly define what people are signing up for, especially for a what-to-bring list or role assignments. If you want someone to bring healthy snacks for kids to enjoy after a game, specify that. You want your volunteers to feel confident in what they’re bringing and to make it easy for them to know what’s expected of them. It will save them time and stress (and you, too!). That being said, if you make your ask too specific (for example, asking for a hard-to-source item or something expensive), you may not end up with a volunteer for it. So be clear about what you expect, but also be reasonable!

Aside from providing the basic signup information, you can also add optional descriptions to both your entire signup sheet and individual slots. While not required, they can help guide your volunteers further and provide more information. You can add information about allergies, preferences and general info about the event. You can also add a wish list to make it easier for your volunteers to bring exactly what you need!

What are the benefits of using a signup sheet template?

Signup sheet templates offer a ton of advantages for both organizers and volunteers and with Evite SignUp Sheets, you'll enjoy even more benefits than other digital and paper signup sheets! Some benefits our signup sheet templates offer include:

  • A 100% free experience (no subscriptions required!).
  • Shareable links for quick and easy sharing.
  • No need to create another login—you can use your existing Evite account.
  • The option to add a wish list to help your volunteers out.
  • Automatic reminders—we’ll remind everyone on your behalf.
  • An easy-to-use experience with eye-catching guided templates.
  • Clean, modern designs with no pop-up ads.

With Evite SignUp Sheets, you can enjoy organizing and coordinating all your events with ease. Signup sheets streamline the signup process for everyone involved, ensuring that everything will go to plan on the day of your event while saving you precious time in the process.

View More Articles

View All